Getting Started with Machine Learning

Machine learning is a such a deep and complex subject that you could spend decades studying it. However, I wanted to see how fast I could get up and running with some ML tools and solve a simple classification problem.

I set out searching for software with three criteria in mind:

  1. It had to be free.
  2. It had to be easy to use.
  3. It should allow me to train a model using a CSV or other simple format.

I found an application called “Orange” which uses visual workflows. This looked promising so I downloaded v3.21. Installation was simple but took a really long time. I just followed the prompts and went with all the defaults except for unchecking the “learn more” boxes.

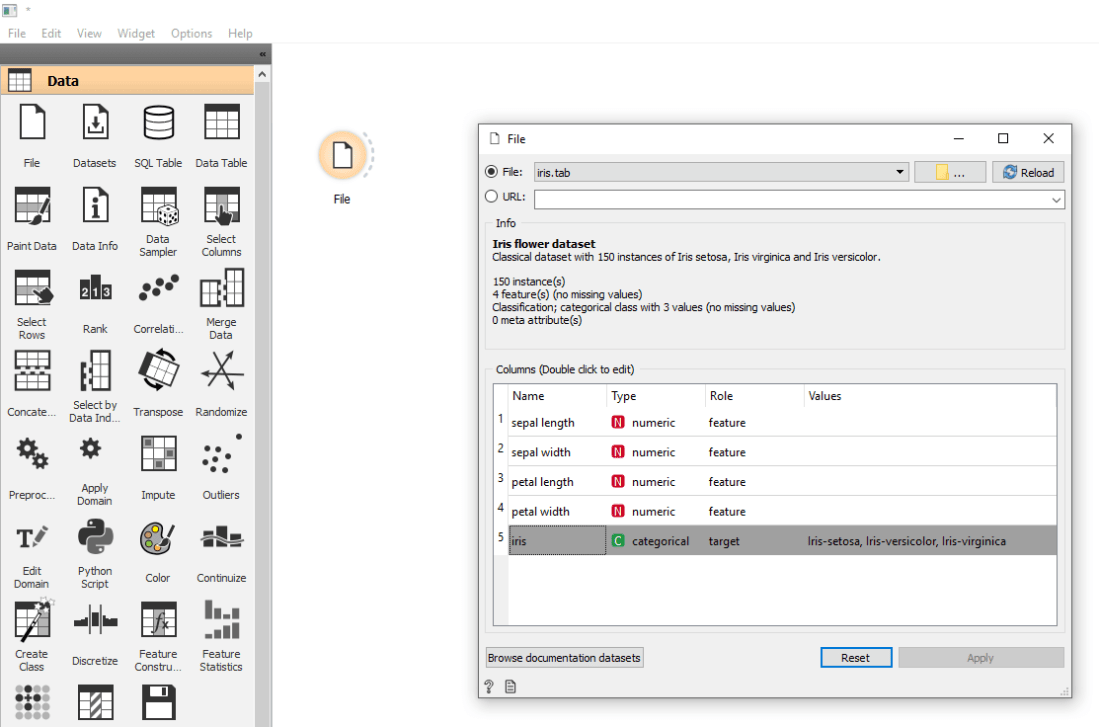
I wanted to train a machine learning model with data from a file, so the first thing I did was to drag a File component onto the canvas and double-clicked on it. The default file is “iris.tab”, and opening it in a text editor revealed that it’s a simple, tab-delimited file with information about different kinds of Irises. This is a subset of a famous Iris data set from 1936.

orange-file-widget

The first three lines of the file are header data, and they are explained in the documentation: “The first row lists attribute names, the second row defines their domain (continuous, discrete and string, or abbreviated c, d and s), and the third row an optional type (class, meta, or ignore).”

A quick Google search tells us that continuous data is any numeric value within a range, and discrete data is limited to certain values. This makes sense when you look at the values in each column.

The “iris” column, which indicates the species of Iris, has a “class” attribute. In the Orange UI it has a role of “target”. I take that to mean that this is the value we’re trying to guess from the features (the other columns).

Sooo… what can we do with this? I wanted to train a model from the data, so I went and placed a Neural Network widget onto the main canvas. Then I clicked and dragged to create a channel between the two widgets. I noticed by hovering over a widget you can see the inputs and outputs.

Neural Networks output models, which is great, but how do we use a model to make predictions? There is a Predictions widget under Evaluate but it takes predictors, not a model. I tried it anyway and it seemed to work.

Finally I needed a way to view the predictions. Based on screenshots of Orange workflows, I deduced that I wanted a Data Table. So far, so good, but the link between the Predictions and Data Table was dashed which meant something was missing. That something was test data to predict from.

orange-iris-workflow

I made a copy of iris.tab and deleted the iris column. I deleted all but a single row for each type of iris. Then I took this predict-irises file and hooked it up to the predictions widget. Now how do I run this thing?

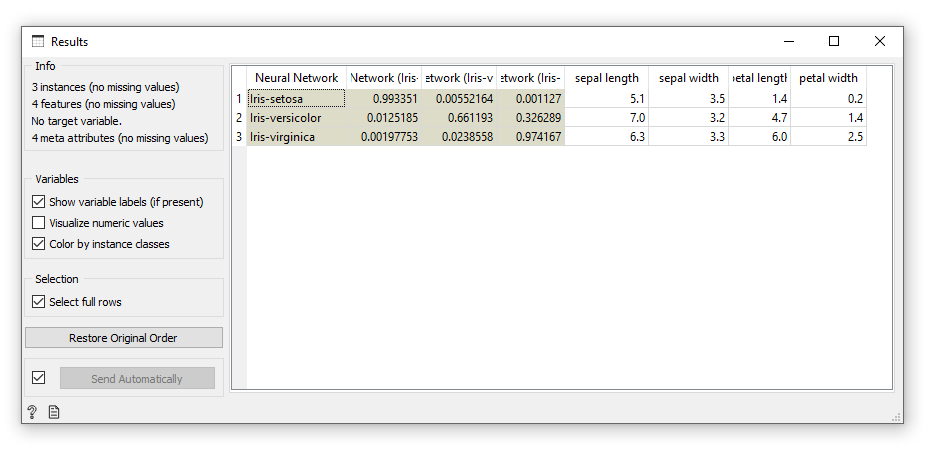
I saw a pause button but no play button which suggested that the workflow runs automatically. I opened the Data Table and the NN’s predictions were displayed! It also showed columns for each class with a number between 0 and 1. Based on the numbers shown, I’m guessing this is a confidence value.

orange-iris-results

All the predictions were correct, but this is hardly surprising. That’s because the test data was part of the training data. A much better test would be to remove rows from the training file and use those only in the test. So I went back and removed the first row of each type of iris from the training set and placed those specific rows into the test file. Again the prediction was flawless. Impressive!

Next I wanted to try my own problem. I came up with the idea of guessing the language of a word. There would only be one feature – the word itself – and the target would be the language that word belongs to. I found a website with large lists of words in several languages. I downloaded files for German, Spanish, French, Italian, and English.

Preparing your data is an extremely important part of effective data mining (perhaps the most important part), so I wrote a tool in C# to pre-process the word lists. I pared each one down to a reasonable size by only selecting six-letter words, which I thought was a good average length that would have enough information to train on. Then I removed all words that were duplicated across languages and randomized the word order. Finally, I created the Orange file header and wrote the results to two separate .tab files. One file had 5000 rows for testing, and the other 30,000 or so would be used for training.

orange-tool-snippet

At this point I encountered a problem: Orange can’t use string values as features. So I had to break each word down into individual letters, where each letter would be a feature. I left the full word in as metadata so I could easily read the results. I built a workflow just as before and it worked! I made a neural network that could guess the language of a word!

orange-language-workflow

orange-language-results
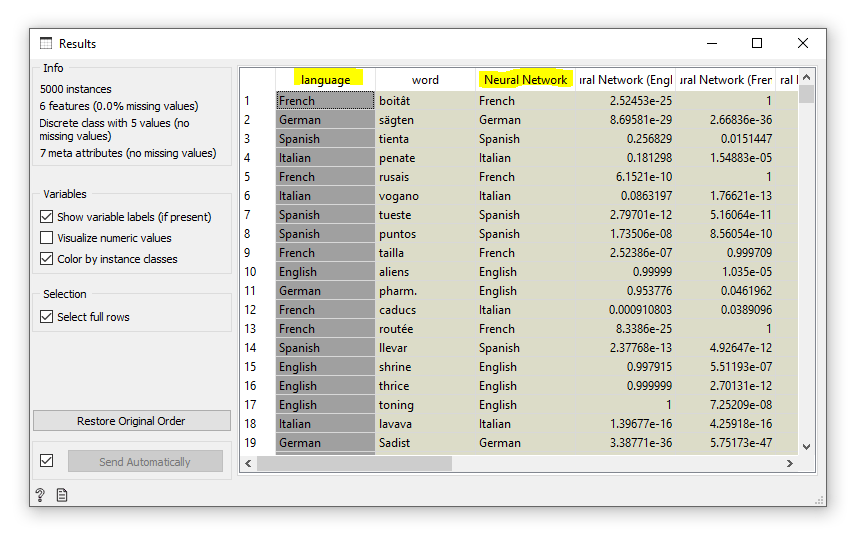
The “language” column shows the actual language.
The “Neural Network” column shows the model’s prediction.

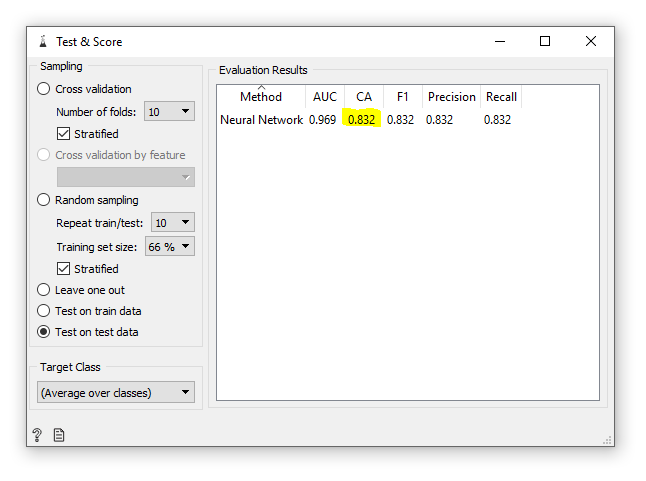
There was one more thing I wanted to do, and that was to automatically score the accuracy of the results. I added a “Test & Score” widget and wired up the necessary inputs. The final result was an accuracy of 83.2%. Not bad at all!

orange-language-accuracy

In this experiment I found that Orange is a great visual tool for machine learning and it’s really fun to use. With the exception of a couple of crashes that may have been caused by human error, it ran very smoothly. Even with all the settings at their defaults, I was able to create a working neural-network-based solution with good accuracy.

I’ve only scratched the surface of Orange’s functionality, and I look forward to discovering what other amazing things it can do.

Advertisement

Experimenting with Videogrammetry

Photogrammetry can be used to make a 3D model from a collection of photographs. A subject is captured from many different angles, and special software is used to process the images and generate a point cloud, or group of 3D points. Photogrammetry has been used to great effect in video games, and allows developers to create highly realistic backgrounds.

I recently discovered a free and open-source photogrammetry application called “Meshroom“, and I immediately wondered if it could use videos for input as well as photographs. I found other users asking similar questions on the meshroom github page. One individual recommended Zephyr, which is proprietary 3D reconstruction software. In the interest of creating a completely free videogrammetry solution, I designed a simple Zephyr-inspired Windows tool to convert video to a series of individual frames.

image-extractor-ui

My program is basically a UI front-end for ffmpeg, which is a free suite of video software. Using the selected on-screen values, it builds a command line with the right parameters to extract the desired images. I also wrote some blur- and similarity-detection code with the Emgu CV library, but I didn’t end up needing those features.

Using a Panasonic Lumix G7, I recorded a video of a turtle figurine. I put the turtle on a foam board and rotated it 360 degrees.

turtle-video.png

This approach isn’t recommended, and I soon discovered why. The moving shadows confused Meshroom and I got this weird structure hanging off the bottom of the generated 3D model.

turtle-blender

The preferred method is to move the camera around the subject being photographed, but limited space made this impossible for my setup.

Having learned my lesson, I went outside and shot some footage of a large planter. The weather was overcast, which is good for preventing harsh shadows. But I encountered another issue. Regardless of shutter speed or how steadily I held the camera, most of the frames were too blurry to be useful for 3D reconstruction.

planter-video.png

This is a known challenge in videogrammetry, and I didn’t bother loading the images into Meshroom since I’m sure the quality would be poor. As I was recording this it began to rain, and rather than try again later, I decided to try a completely different type of video.

I went online and found a public domain clip of a chapel in Germany, recorded by a drone rotating around the building from a high elevation. The motion was smooth and the frames were sharp, even though it didn’t cover a full 360 degrees of motion. The results were surprisingly good, and I got a nice 3D model for my efforts.

chapel-meshroom.png

Loaded into Blender, the textured model is quite realistic.

chapel-blender.png

Based on these tests, I wouldn’t recommend videogrammetry over photogrammetry. Even though you can capture dozens or hundreds of images easily with just a short video clip, it’s hard to match the quality of photos snapped individually. Although this was a fun and useful experiment, the main thing I learned is that unless you only have video source material, videogrammetry probably isn’t worth it.

Using Dependency Injection with CSLA

CSLA.NET is a framework that provides standardized business logic functionality to your applications. It includes a rules engine, business object persistence, and more. I first encountered it on a project at my current job.

My initial impression of CSLA was that it was intrusive. It requires you to derive all your editable business objects from a base class, which violates the “composition over inheritance” principle. Then there’s the DataPortal, an object that wants to manage all your data access. I found that many of the BOs in our application could only be created via DataPortal_Create() or DataPortal_Fetch(). On the surface it appears we have very little control over the BO life cycle.

After feeling the pain of trying to unit test a bunch of existing BusinessBase-inheriting classes, I set out to find a way to use dependency injection with CSLA. Interestingly, DI is mentioned in the CslaFastStart sample, but there are no details on how to utilize it. I didn’t want to resort to service location, so I searched until I found an article on magenic.com called “Abstractions in CSLA” which offers a clean implementation of DI using Autofac.

I started with a slightly modified CslaFastStart, and applied a simplified version of the approach from the Magenic article. I’ll share some of the highlights of this process.

Like the Fast Start example, let’s assume we have a business object called Person that inherits from BusinessBase. (The original code names it PersonEdit, but it’s often considered bad practice to include verbs in your class names.) As you can see, we have a few registered properties along with our DataPortal override methods. These methods instantiate a PersonRepository (PersonDal in the original) to do their work.

    [Serializable]
    public class Person : BusinessBase
    {
        public static readonly PropertyInfo IdProperty = RegisterProperty(c => c.Id);

        public int Id
        {
            get => GetProperty(IdProperty);
            private set => LoadProperty(IdProperty, value);
        }

        public static readonly PropertyInfo FirstNameProperty = RegisterProperty(c => c.FirstName);

        [Required]
        public string FirstName
        {
            get => GetProperty(FirstNameProperty);
            set => SetProperty(FirstNameProperty, value);
        }

        public static readonly PropertyInfo LastNameProperty = RegisterProperty(c => c.LastName);

        [Required]
        public string LastName
        {
            get => GetProperty(LastNameProperty);
            set => SetProperty(LastNameProperty, value);
        }

        public static readonly PropertyInfo LastSavedDateProperty = RegisterProperty(c => c.LastSavedDate);

        public DateTime? LastSavedDate
        {
            get => GetProperty(LastSavedDateProperty);
            private set => SetProperty(LastSavedDateProperty, value);
        }

        protected override void DataPortal_Create()
        {
            var personRepository = new PersonRepository();
            var dto = personRepository.Create();

            using (BypassPropertyChecks)
            {
                Id = dto.Id;
                FirstName = dto.FirstName;
                LastName = dto.LastName;
            }

            BusinessRules.CheckRules();
        }

        protected override void DataPortal_Insert()
        {
            using (BypassPropertyChecks)
            {
                LastSavedDate = DateTime.Now;

                var dto = new PersonDto
                {
                    FirstName = FirstName,
                    LastName = LastName,
                    LastSavedDate = LastSavedDate
                };

                var personRepository = new PersonRepository();
                Id = personRepository.InsertPerson(dto);
            }
        }

        protected override void DataPortal_Update()
        {
            using (BypassPropertyChecks)
            {
                LastSavedDate = DateTime.Now;

                var dto = new PersonDto
                {
                    Id = Id,
                    FirstName = FirstName,
                    LastName = LastName,
                    LastSavedDate = LastSavedDate
                };

                var personRepository = new PersonRepository();
                personRepository.UpdatePerson(dto);
            }
        }

        private void DataPortal_Delete(int id)
        {
            using (BypassPropertyChecks)
            {
                var personRepository = new PersonRepository();
                personRepository.DeletePerson(id);
            }
        }

        protected override void DataPortal_DeleteSelf()
        {
            DataPortal_Delete(Id);
        }
    }

In our Program.Main(), we create a new person via the DataPortal, assign property values based on user input, do some validation, and save if possible. Nothing unusual here, and when you run the program it all works as expected.

    public class Program
    {
        public static void Main()
        {
            Console.WriteLine("Creating a new person");
            var person = DataPortal.Create();

            Console.Write("Enter first name: ");
            person.FirstName = Console.ReadLine();

            Console.Write("Enter last name: ");
            person.LastName = Console.ReadLine();

            if (person.IsSavable)
            {
                person = person.Save();
                Console.WriteLine($"Added person with id {person.Id}. First name = '{person.FirstName}', last name = '{person.LastName}'.");
                Console.WriteLine($"Last saved date: {person.LastSavedDate}");
            }
            else
            {
                Console.WriteLine("Invalid entry");

                foreach (var item in person.BrokenRulesCollection)
                {
                    Console.WriteLine(item.Description);
                }

                Console.ReadKey();

                return;
            }

            Console.ReadKey();
        }
    }

The problem comes when we try to write unit tests. Let’s create a test that checks the LastSavedDate property when the Person is saved. We’ll allow one minute of leeway in our assertion, since it takes time for the test to run. Ideally we would fake DateTime.Now as well, but it doesn’t really matter in this contrived example.

    [TestFixture]
    public class PersonTests
    {
        [Test]
        public void LastSavedDate_GivenPersonIsSaved_ReturnsCurrentTime()
        {
            // Arrange

            var person = new Person
            {
                FirstName = "Jane",
                LastName = "Doe"
            };

            person = person.Save();

            // Act

            var lastSavedDate = DateTime.Now;

            if (person.LastSavedDate != null)
            {
                lastSavedDate = person.LastSavedDate.Value;
            }

            // Assert

            // Allow up to one minute for test to run.
            Assert.LessOrEqual(DateTime.Now.Subtract(lastSavedDate).TotalMinutes, 1);
        }
    }

When we run the test we get an exception relating to the connection string. It’s stored in a configuration file in the data access layer which is inaccessible from the test project, which causes the error. The Person class creates new instances of the PersonRepository directly, which introduces tight coupling and makes testing difficult.

Csla.DataPortalException : DataPortal.Update failed (Valid connection string not found.)
  ----> Csla.Reflection.CallMethodException : Person.DataPortal_Insert method call failed
  ----> System.Exception : Valid connection string not found.

So what can we do? If we want to inject the repository as a dependency, we need to hand control of our business object creation over to our IoC container, which in this case would be Autofac. This can be done via a custom DataPortalActivator which we’ll call AutofacDataPortalActivator.

    public class AutofacDataPortalActivator : IDataPortalActivator
    {
        private readonly IContainer _container;

        public AutofacDataPortalActivator(IContainer container)
        {
            _container = container ?? throw new ArgumentNullException(nameof(container));
        }

        public object CreateInstance(Type requestedType)
        {
            if (requestedType == null)
                throw new ArgumentNullException(nameof(requestedType));

            return Activator.CreateInstance(requestedType);
        }

        public void InitializeInstance(object obj)
        {
            if (obj == null)
                throw new ArgumentNullException(nameof(obj));

            var scope = _container.BeginLifetimeScope();
            ((IScopedBusiness)obj).Scope = scope;
            scope.InjectProperties(obj);
        }

        public void FinalizeInstance(object obj)
        {
            if (obj == null)
                throw new ArgumentNullException(nameof(obj));

            ((IScopedBusiness)obj).Scope.Dispose();
        }

        public Type ResolveType(Type requestedType)
        {
            if (requestedType == null)
                throw new ArgumentNullException(nameof(requestedType));

            return requestedType;
        }
    }

The most notable part of this class is the InjectProperties call, which uses the registered components to inject properties into a BO instance.

In Program.cs, we assign a new data portal activator at the top, and configure our IoC container at the bottom. There you’ll see an IPersonRepository interface that resolves to a new PersonRepository instance.

    public class Program
    {
        public static void Main()
        {
            ApplicationContext.DataPortalActivator = new AutofacDataPortalActivator(CreateContainer());

            Console.WriteLine("Creating a new person");
            var person = DataPortal.Create();

            Console.Write("Enter first name: ");
            person.FirstName = Console.ReadLine();

            Console.Write("Enter last name: ");
            person.LastName = Console.ReadLine();

            if (person.IsSavable)
            {
                person = person.Save();
                Console.WriteLine($"Added person with id {person.Id}. First name = '{person.FirstName}', last name = '{person.LastName}'.");
                Console.WriteLine($"Last saved date: {person.LastSavedDate}");
            }
            else
            {
                Console.WriteLine("Invalid entry");

                foreach (var item in person.BrokenRulesCollection)
                {
                    Console.WriteLine(item.Description);
                }

                Console.ReadKey();

                return;
            }

            Console.ReadKey();
        }

        private static IContainer CreateContainer()
        {
            var builder = new ContainerBuilder();
            builder.RegisterInstance(new PersonRepository());

            return builder.Build();
        }
    }

We’ll also need to make some changes to the Person class. We now inherit from ScopedBusinessBase because it gives us the IScopedBusiness interface we need to make our data portal activator work. And the PersonRepository concrete class instances are replaced with an IPersonRepository property.

    [Serializable]
    public class Person : ScopedBusinessBase
    {
        public IPersonRepository PersonRepository { get; set; }

        public static readonly PropertyInfo IdProperty = RegisterProperty(c => c.Id);

        public int Id
        {
            get => GetProperty(IdProperty);
            private set => LoadProperty(IdProperty, value);
        }

        public static readonly PropertyInfo FirstNameProperty = RegisterProperty(c => c.FirstName);

        [Required]
        public string FirstName
        {
            get => GetProperty(FirstNameProperty);
            set => SetProperty(FirstNameProperty, value);
        }

        public static readonly PropertyInfo LastNameProperty = RegisterProperty(c => c.LastName);

        [Required]
        public string LastName
        {
            get => GetProperty(LastNameProperty);
            set => SetProperty(LastNameProperty, value);
        }

        public static readonly PropertyInfo LastSavedDateProperty = RegisterProperty(c => c.LastSavedDate);

        public DateTime? LastSavedDate
        {
            get => GetProperty(LastSavedDateProperty);
            private set => SetProperty(LastSavedDateProperty, value);
        }

        protected override void DataPortal_Create()
        {
            var dto = PersonRepository.Create();

            using (BypassPropertyChecks)
            {
                Id = dto.Id;
                FirstName = dto.FirstName;
                LastName = dto.LastName;
            }

            BusinessRules.CheckRules();
        }

...

        protected override void DataPortal_DeleteSelf()
        {
            DataPortal_Delete(Id);
        }
    }

And what about our test? Since the Person repository is now exposed as a public property of the Person, we can assign a mock with a minimal implementation. Only one additional line of code is needed.

    [TestFixture]
    public class PersonTests
    {
        [Test]
        public void LastSavedDate_GivenPersonIsSaved_ReturnsCurrentTime()
        {
            // Arrange
            var person = new Person
            {
                PersonRepository = new MockPersonRepository(),
                FirstName = "Jane",
                LastName = "Doe"
            };

            person = person.Save();

            // Act

            var lastSavedDate = DateTime.Now;

            if (person.LastSavedDate != null)
            {
                lastSavedDate = person.LastSavedDate.Value;
            }

            // Assert

            // Allow up to one minute for test to run.
            Assert.LessOrEqual(DateTime.Now.Subtract(lastSavedDate).TotalMinutes, 1);
        }
    }

Throughout this experiment I’ve tried to find the simplest solution that works. That means the code may not be fully robust or production-ready. But it does illustrate that using DI with CSLA.NET is possible without too much trouble after the initial setup. I’m not sure I would use CSLA for greenfield projects, but at least the latest versions are adequately configurable.
Micro-ORMs for .NET Compared – Part 3

This is the final part of a 3-part series comparing micro-ORMs.  We’ve already seen Dapper and Massive.  Now it’s time for PetaPoco.

PetaPoco

Website: http://www.toptensoftware.com/petapoco/
Code: https://github.com/toptensoftware/petapoco
NuGet: http://nuget.org/packages/PetaPoco

Databases supported: SQL Server, SQL Server CE, Oracle, PostgreSQL, MySQL
Size: 2330 lines of code

Description

PetaPoco was, like the website states, “inspired by Rob Conery’s Massive project but for use with non-dynamic POCO objects.”  A couple of the more notable features include T4 templates to automatically generate POCO classes, and a low-friction SQL builder class

Installation

There are two packages available to install: Core Only and Core + T4 Templates.  I chose the one with templates, which raises a dialog with the following message:

“Running this text template can potentially harm your computer.  Do not run it if you obtained it from an untrusted source.”

PetaPoco has a click-to-accept Apache License.  If your project is a console application, you’ll need to add an App.config file.

Usage

Because PetaPoco uses POCOs, it looks more like Dapper than Massive at first glance:

class Product
{
    public int ProductId { get; set; }
    public string ProductName { get; set; }
}

class Program
{
    private static void Main(string[] args)
    {
        var db = new Database("northwind");
        var products = db.Query("SELECT * FROM Products");
    }
}

There is also experimental support for “dynamic” queries if you need them:

var products = db.Query("SELECT * FROM Products");

PetaPoco has a lot of cool features, including paged fetches (a wheel I’ve reinvented far too many times):

var pagedResult = db.Page(sql: "SELECT * FROM Products",
    page: 2, itemsPerPage: 20);

foreach (var product in pagedResult.Items)
{
    Console.WriteLine("{0} - {1}", product.ProductId,
        product.ProductName);
}

While POCOs give you the benefit of static typing, and System.Dynamic frees you from the burden of defining all your objects by hand, templates attempt to give you the best of both worlds.

The first thing you have to do the use templates is ensure that your connection string has a provider name.  Otherwise the code generator will fail.  Then you must configure the Database.tt file.  I changed the following lines:

ConnectionStringName = "northwind";  // Uses last connection string in config if not specified
Namespace = "Northwind";

When you save it, you might get a security warning because Visual Studio is about to generate code from the template.  You can dismiss the warning if you haven’t already.

Now you can use the generated POCOs in your code:

var products = Northwind.Product.Query("SELECT * FROM Products");

First Impressions

PetaPoco is surprisingly full-featured for a micro-ORM while maintaining a light feel and small code size.  There is too much to show in a single blog post, so you should check out the PetaPoco website for a full description of what this tool is capable of.

Final Comparison

All of these micro-ORMs fill a similar need, which is to replace a full-featured ORM with something smaller, simpler, and potentially faster.  That said, each one has its own strengths and weaknesses.  Here are my recommendations based on my own limited testing.

You should consider… If you’re looking for…
Dapper Performance, proven stability
Massive Tiny size, flexibility
PetaPoco POCOs without the pain, more features

Micro-ORMs for .NET Compared – Part 2

This is Part 2 of a 3-part series.  Last time we took a look at Dapper.  This time we’ll see what Massive has to offer.

Massive

Website: http://blog.wekeroad.com/helpy-stuff/and-i-shall-call-it-massive
Code: https://github.com/robconery/massive
NuGet: http://www.nuget.org/packages/Massive

Databases supported: SQL Server, Oracle, PostgreSQL, SQLite
Size: 673 lines of code

Description

Massive was created by Rob Conery.  It relies heavily on the dynamic features of C# 4 and makes extensive use of the ExpandoObject.  It has no dependencies besides what’s in the GAC.

Installation

Unlike Dapper and PetaPoco, Massive does not show up in a normal NuGet search.  You’ll have to go to the Package Manager Console and type “Install-Package Massive -Version 1.1” to install it.  If your solution has multiple projects, make sure you select the correct default project first.

If your project is a console application, you’ll need to add a reference to System.Configuration.

Usage

Despite its name, Massive is tiny.  Weighing in at under 700 lines of code, it is the smallest micro-ORM I tested.  Because it uses dynamics and creates a connection itself, you can get up and running with very little code indeed:

class Products : DynamicModel
{
    public Products() : base("northwind", primaryKeyField: "ProductID") { }
}

class Program
{
    private static void Main(string[] args)
    {
        var tbl = new Products();
        var products = tbl.All();
    }
}

It’s great not having to worry about setting up POCO properties by hand, and depending on your application, this could save you some work when your database schema changes.

However, the fact that this tool relies on System.Dynamic is also its biggest weakness.  You can’t use Visual Studio’s Intellisense to discover properties on returned results, and if you mistype the name of a property, you won’t know it until runtime.  Like most things in life, there are tradeoffs.  If you’re terrified of “scary hippy code”, then this could be a problem.

First Impressions

Massive is very compact and extremely flexible as a result of the design choice to use dynamics.  If you’re willing to code without the Intellisense safety net and can live without static typing, it’s a great way to keep your data mapping simple.

Continue to Part 3…

Micro-ORMs for .NET Compared – Part 1

Recently, I have been made aware of a lightweight alternative to full-blown ORMs like NHibernate and Entity Framework.  They’re called micro-ORMs, and I decided to test-drive a few of the more popular ones to see how they compare.

Each of the tools listed here are small and contained within a single file (hence the “micro” part of the name).  If you’re adventurous, it’s worth having a look at the code since they use some interesting and powerful techniques to implement their mapping, such as Reflection.Emit, C# 4 dynamic features, and T4 templates.

The Software

Dapper

Website: http://code.google.com/p/dapper-dot-net/
GitHub: https://github.com/SamSaffron/dapper-dot-net
NuGet: http://nuget.org/packages/Dapper

Databases supported: Any database with an ADO.NET provider
Size: 2345 lines of code

Description

Dapper was written by Sam Saffron and Marc Gravell and is used by the popular programmer site Stack Overflow.  It’s designed with an emphasis on performance, and even uses Reflection.Emit to generate code on-the-fly internally.  The Dapper website has metrics to show its performance relative to other ORMs.

Among Dapper’s features are list support, buffered and unbuffered readers, multi mapping, and multiple result sets.

Installation

In Visual Studio, use Manage NuGet Packages, search for “Dapper”, and click Install.  Couldn’t be easier.

Usage

Here we select all rows from a Products table and return a collection of Product objects:

class Product
{
    public int ProductId { get; set; }
    public string ProductName { get; set; }
}

class Program
{
    private static void Main(string[] args)
    {
        using (var conn = new SqlConnection("Data Source=.\\SQLEXPRESS;
            Initial Catalog=Northwind;Integrated Security=SSPI;"))
        {
            conn.Open();
            var products = conn.Query<Product>("SELECT * FROM Products");
        }
    }
}

As you can see from the example, Dapper expects an open connection, so you have to set that up yourself.  It’s also picky about data types when mapping to a strongly typed list.  For example, if you try to map a 16-bit database column to a 32-bit int property you’ll get a column parsing error.  Mapping is case-insensitive, and you can map to objects that have missing or extra properties compared with the columns you are mapping from.

Dapper can output a collection of dynamic objects if you use Query() instead of Query<T>():

    var shippers = conn.Query("SELECT * FROM Shippers");

This saves you the tedium of defining objects just for mapping.

Dapper supports parameterized queries where the parameters are passed in as anonymous classes:

    var customers =
        conn.Query("SELECT * FROM Customers WHERE Country = @Country
            AND ContactTitle = @ContactTitle",
        new { Country = "Canada", ContactTitle = "Marketing Assistant" });

The multi mapping feature is handy and lets you map one row to multiple objects:

class Order
{
    public int OrderId { get; set; }
    public string CustomerId { get; set; }
    public Customer Customer { get; set; }
    public DateTime OrderDate { get; set; }
}

class Customer
{
    public string CustomerId { get; set; }
    public string City { get; set; }
}

...

var sql =
    @"SELECT * FROM
        Orders o
        INNER JOIN Customers c
            ON c.CustomerID = o.CustomerID
    WHERE
        c.ContactName = 'Bernardo Batista'";

var orders = conn.Query<order, customer,="" order="">(sql,
    (order, customer) => { order.Customer = customer; return order; },
    splitOn: "CustomerID");

var firstOrder = orders.First();

Console.WriteLine("Order date: {0}", firstOrder.OrderDate.ToShortDateString());

Console.WriteLine("Customer city: {0}", firstOrder.Customer.City);

Here, the Customer property of the Order class does not correspond to a database column.  Instead, it will be populated with customer data that was joined to the order in the query.

Make sure to join tables in the right order or you may not get back the results you expect.

First Impressions

Dapper is slightly larger than some other micro-ORMs, but its focus on raw performance means that it excels in that area.  It is flexible and works with POCOs or dynamic objects, and its use on the Stack Overflow website suggests that it is stable and well-tested.

Continue to Part 2…

Ignoring ReSharper Code Issues in Your New ASP.NET MVC 3 Application

ReSharper is a great tool for identifying problems with your code.  Simply right-click on any project in the Solution Explorer and select Find Code Issues.  After ReSharper analyzes all the files, you’ll see a window with several categories of issues including “Common Practices and Code Improvements”, “Constraint Violations”, and “Potential Code Quality Issues”.

Unfortunately, when you create a new ASP.NET MVC 3 application in Visual Studio 2010, Resharper will find thousands of code issues before you even start coding.

2019 issues found

Most of these “issues” are in jQuery and Microsoft’s AJAX libraries, and your average developer is not going to go around adding semicolons all day when they have real work to do.  So we need to tell ReSharper to ignore these known issues somehow.

It would be nice if ReSharper allowed you to ignore files using file masks, but it doesn’t.  You must specify each file or folder individually.  Go to ReSharper->Options…->Code Inspection->Settings.  Click Edit Items to Skip.

My first instinct was to lasso or shift-click to select all the jQuery scripts, but this is not allowed!  I certainly wasn’t going to bounce back and forth between dialog windows a dozen times just to add each file.

Luckily this is ReSharper, and we can move all the script files into another directory and update references automatically.  Select all the jQuery scripts in the Scripts folder simultaneously, right-click, and go to Refactor->Move.  Create a new jquery folder under Scripts and click Next.

Move to Folder

Now you can go back into the ReSharper options and add this folder to the list of items to skip.

Skip jQuery folder

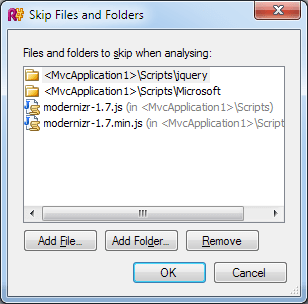
Move Microsoft’s script files into their own folder, and tell ReSharper to ignore these as well.  I’m also using modernizr so I exluded the two modernizr scripts individually.

Skip Files and Folders

Find Code Issues again and things should look much better.  I’ve only got 25 issues now.

25 code issues

With the help of ReSharper’s refactoring capabilities I was able to get this down to one issue in just a few minutes.  Now you can get on with your project without having to mentally filter out a bunch of noise in the Inspection Results window.

Happy coding!

An HTML5 Music Visualizer for Dev:Unplugged

HTML5 is Here

Although HTML5 is still in development, the latest generation of popular browsers (those released within the past month or so) support a surprisingly consistent set of HTML5 features.  This allows developers to start seriously targeting the future standard and taking advantage of its many benefits.

The Contest

Microsoft is currently running a contest called {Dev:Unplugged} that gives Web developers the opportunity to showcase their HTML5 skills.  Entrants have the option of creating a game or music-related site, and compete for some awesome prizes.  On May 9, an expert team of judges will start evaluating entries based on several criteria such as creativity, quality, and fit with the contest theme.

My Entry: html5beats.com

What it is

html5beats is a music visualizer that generates real time animations that respond to the beat of the music.  In the past you had to use Flash or embedded media players to accomplish this.  With HTML5 you can do it with JavaScript and markup alone.

How it works

To synchronize audio and video, you must have access to the raw audio data.  Unfortunately, browsers don’t offer provide this access in a consistent way (and some don’t offer it at all).  I wrote a small C# program that preprocesses the sound files and I add the output (RMS amplitude) to a JavaScript file.  It doesn’t need to be high resolution (8 bit, 40Hz) so it works out to only about 20KB per song.  At first I thought I invented this method, but I Googled around and discovered that someone else beat me to it.  Nevertheless, it works well in practice and provides interesting results.

Features

Cross-browser compatibility

The following browsers are officially supported:

You can try other browsers with varying results.  Some will trigger a compatibility message, while others (like Firefox 3.6) will mostly work, but the site won’t look as good.

Full screen mode

The HTML5 canvas does not explicitly support full screen.  I solve this problem by using a second canvas that fills the entire page.  The image from the smaller main canvas is copied to the larger one every frame.  This may sound inefficient, but it performs well in all my tests.

Lyrics

This feature displays lyrics as the song plays, and can be turned on or off.  Although the canvas supports text directly, drawing straight to the canvas would interfere with some of the inter-frame effects I’m using.  Therefore, I position a div element over the canvas and change its inner text dynamically.

Pinned site features

Internet Explorer 9 offers a great new feature called “pinned sites” that provide Windows 7 desktop integration.  I’ve taken advantage of several pinned site features that enhance the user experience under IE9.

Feature detection and discoverability

Pinned site prompt

If you’re browsing with IE9, html5beats will detect it and prompt you to try pinning the site.  If you don’t like seeing this prompt you can close it.  Pinning your site adds a high-quality icon to the taskbar and gives you access to additional functionality.

Jump List

Jump List

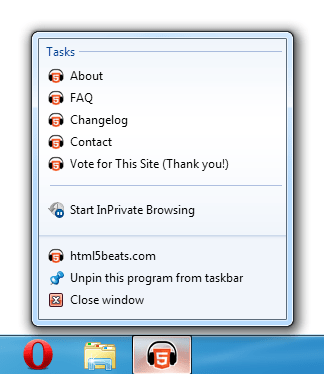
Right-clicking the taskbar icon shows a Jump List with tasks that can take you directly to a specific page within the site, even if the browser isn’t currently open.

Thumbnail Toolbar

Thumbnail toolbar

This is one of the coolest aspects of pinning the site.  Hovering over the taskbar reveals playback buttons so you can play, pause, and navigate songs even when the browser doesn’t have focus.

Update: Previous Track and Next Track buttons have been added for additional control of the player.

CSS3

Until now, effects like rounded corners, shadows, and translucency were only available through browser-specific features, custom images, and elaborate CSS trickery.  CSS3 makes those techniques obsolete.  html5beats exploits CSS3 to improve the aesthetics of the main UI.

Using the Code

For now I’m disallowing use of the code, mainly to prevent someone from using it in a competing entry.  After the contest ends I plan on cleaning it up a bit and releasing it under an open-source license.

Please Consider Supporting the Site with Your Vote

In addition to a earning a high score from the judges, winning requires votes from the community.  If you like my entry, please vote for it today… there’s only one week left!  Also, look forward to new features and updates in the coming days – this is the home stretch.

Profiling Built-In JavaScript Functions with Firebug

Firebug is a Web development tool for Firefox.  Among other things, it lets you profile your JavaScript code to find performance bottlenecks.

To get started, simply go to the Firebug Web site, install the plugin, load a page in Firefox and activate Firebug.  Click the Profile button under the Console tab once to start profiling, and again to stop it.  Firebug will display a list of functions, the number of times they were called, and the time spent in each one.

For example, here is a page that repeatedly draws a red rectangle and blue circle on the new HTML5 canvas:

<!DOCTYPE html>
<html>
    <head>
        <meta charset="utf-8" />
        <title>Profiling Example</title>
    </head>
    <body onload="drawShapes();">
        <canvas id="canvasElement" width="200" height="200">
            Your browser does not support the HTML5 Canvas.
        </canvas>
        <script>
            function drawShapes() {
                var canvasElement = document.getElementById('canvasElement');
                var context = canvasElement.getContext('2d');

                context.fillStyle = 'rgb(255, 0, 0)';

                // Draw a red rectangle many times.
                for (var i = 0; i < 1000; i++)
                {
                    context.fillRect(30, 30, 50, 50);
                }

                context.fillStyle = 'rgb(0, 0, 255)';

                // Draw a blue circle many times.
                for (var i = 0; i < 1000; i++)
                {
                    context.beginPath();
                    context.arc(70, 70, 15, Math.PI * 2, 0, true);
                    context.closePath();
                    context.fill();
                }
            }
        </script>
    </body>
</html>

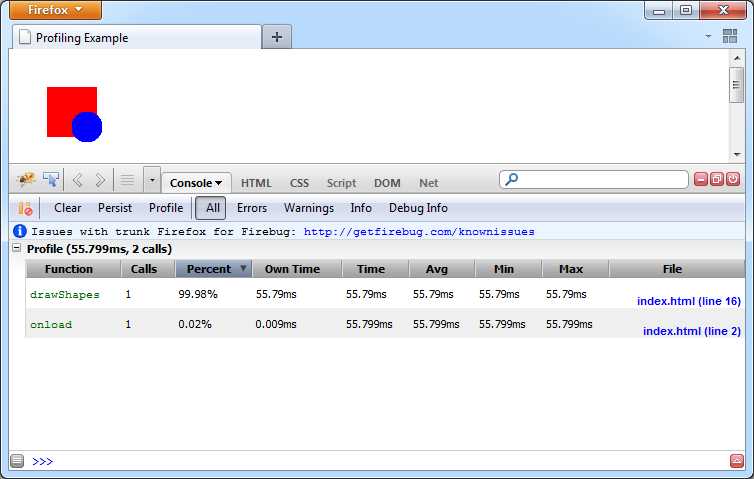
Let’s assume your code is taking a long time to execute.  Running the profile produces these results:

Profiling Results 1
Click to enlarge

This isn’t very useful because only user-defined functions show up.  There is only one significant function here so there’s nothing to compare.  If there were some way to profile built-in JavaScript functions, we might get a better idea of which parts of the code are running slowly.

Note: This is a contrived example written to illustrate a point.  It would be just effective, and probably a better design overall, to extract two methods named drawRectangle() and drawCircle().  See Extract Method.

As a workaround, you could wrap some of the native functions and call the wrappers in your program code, like this:

function drawShapes() {
    var canvasElement = document.getElementById('canvasElement');
    var context = canvasElement.getContext('2d');

    context.fillStyle = 'rgb(255, 0, 0)';

    // Draw a red rectangle many times.
    for (var i = 0; i < 1000; i++)
    {
        fillRect(context, 30, 30, 50, 50);
    }

   context.fillStyle = 'rgb(0, 0, 255)';

    // Draw a blue circle many times.
    for (var i = 0; i < 1000; i++)
    {
        context.beginPath();
        context.arc(70, 70, 15, Math.PI * 2, 0, true);
        context.closePath();
        fill(context);
    }
}

function fillRect(context, x, y, w, h) {
    context.fillRect(30, 30, 50, 50);
}

function fill(context) {
    context.fill();
}

But that would impact your design and create unnecessary overhead.  Ideally, you’ll want a solution that’s only active during debugging and doesn’t affect your production script.  One way to do this is to write overrides for the native functions and store them in their own .js file (don’t forget to reference the script file in the HTML page):

if (window.console.firebug !== undefined)
{
    var p = CanvasRenderingContext2D.prototype;

    p._fillRect = p.fillRect;
    p.fillRect = function (x, y, w, h) { this._fillRect(x, y, w, h) };

    p._fill = p.fill;
    p.fill = function () { this._fill() };
}

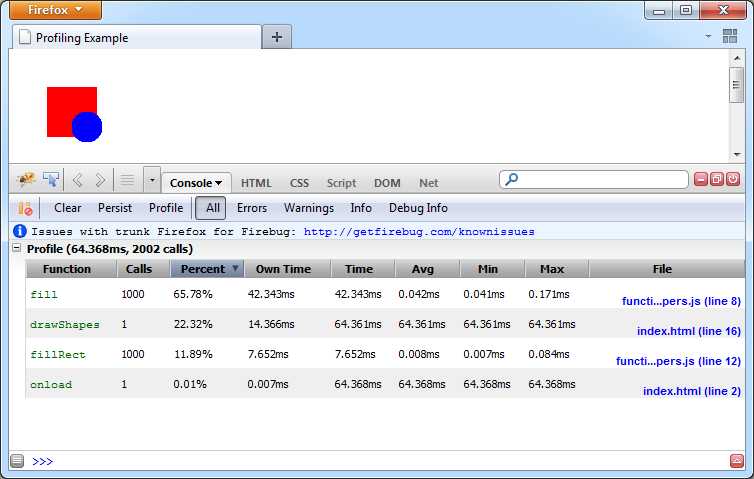
What we’re doing here is saving the original function by assigning it to another function with the same name, prefixed with an underscore.  Then we’re writing over the original with our own function that does nothing but wrap the old one.  This is enough to make it appear in the Firebug profiling results.

Profiling Results 2
Click to enlarge

The beauty of this approach is that it only runs when the Firebug console is turned on.  When it’s not, the conditional check fails and the code block is not executed.  The check also fails in other browsers such as IE9 and Chrome 11 beta, which is exactly what we want.

One disadvantage is that you have to write a separate function for each native function you want to override.  In the above example, a significant amount of time is probably spent in context.arc(), but we didn’t override it so there’s no way to tell.  It may be possible to override and wrap every function in a specified object automatically, but I haven’t tried that yet.  For now, I’ll leave it as an exercise for the reader.

Workaround for NullReferenceException in DBComparer

DBComparer 3.0 is a great tool if you want to synchronize your SQL Server database environments and don’t have hundreds of dollars to spend on Red Gate’s SQL Compare.  It’s simple to use and free.

http://dbcomparer.com/

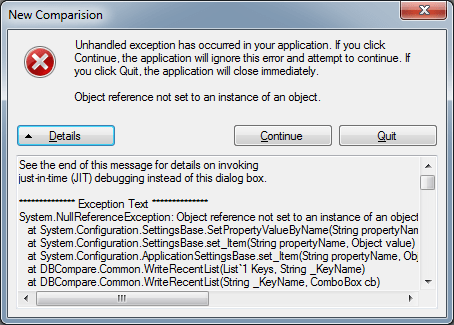
I used it for a couple of weeks without any problem until one day when I tried to compare with a particular server and it crashed:

DBComparer NullReferenceException

Looking at the error message, we can deduce that the WriteRecentList() function saves the names of the servers you have typed in the recent servers list.  This is sort of like the recent files list found in some applications.

SettingsBase is part of the .NET Framework, and this part of the code is probably used to persist application settings.  A little digging around on the MSDN library reveals this:

Specific user data is stored in a file named user.config, stored under the user’s home directory. If roaming profiles are enabled, two versions of the user configuration file could exist. In such a case, the entries in the roaming version take precedence over duplicated entries in the local user configuration file.

A look in the user.config file confirms our theory that this is where the list of recent servers are stored.  However, DBComparer is only designed to support 10 recent server names (5 on each side of the comparison).  Any more than that and it blows up.

<?xml version="1.0" encoding="utf-8"?>
<configuration>
  <userSettings>
    <DBCompare.Properties.Settings>
      <setting name="RecentServerName11" serializeAs="String">
        <value>server1</value>
      </setting>
      <setting name="RecentServerName12" serializeAs="String">
        <value>server2</value>
      </setting>
      <setting name="RecentServerName13" serializeAs="String">
        <value>server3</value>
      </setting>
      <setting name="RecentServerName14" serializeAs="String">
        <value>server4</value>
      </setting>
      <setting name="RecentServerName15" serializeAs="String">
        <value>server5</value>
      </setting>
      <setting name="RecentServerName21" serializeAs="String">
        <value>server6</value>
      </setting>
      <setting name="RecentServerName22" serializeAs="String">
        <value>server7</value>
      </setting>
      <setting name="RecentServerName23" serializeAs="String">
        <value>server8</value>
      </setting>
      <setting name="RecentServerName24" serializeAs="String">
         <value>server9</value>
      </setting>
      <setting name="RecentServerName25" serializeAs="String">
        <value>server10</value>
      </setting>
    </DBCompare.Properties.Settings>
  </userSettings>
</configuration>

As a workaround until this bug is fixed, you can delete some or all of the server names in the value tags to make room for more and prevent the error.