A Brief History of Web Site Projects
With the release of Visual Studio 2005, the ASP.NET Web Application was replaced with something called a “Web Site Project”. There was a strong backlash in the development community, and Microsoft gradually reintroduced the Web Application template to their suite of development tools.
That might have been the end of Web Sites, but Microsoft decided to keep them and the Web Site option is still available in Visual Studio 2010.
A Web.config for Every Environment
If you’ve worked on many ASP.NET projects, you’ve probably seen Web.configs that look like this:
<connectionStrings>
    <add name="DevelopmentDatabase" connectionString="Data Source=devServerAddress;Initial Catalog=devDataBase;Integrated Security=SSPI;"/>
    <!--
    <add name="TestDatabase" connectionString="Data Source=testServerAddress;Initial Catalog=testDataBase;Integrated Security=SSPI;"/>
    <add name="ProductionDatabase" connectionString="Data Source=prodServerAddress;Initial Catalog=prodDataBase;Integrated Security=SSPI;"/>
    -->
</connectionStrings>
You uncomment the relevant settings for the current environment and comment out all the rest.
Alternatively, you could have separate Web.configs for each environment and keep them in sync manually. Or maybe you’ve created build events to manipulate or copy the right Web.config to your output directory based on project configuration. But that doesn’t work in a Web Site project for one simple reason – Web Sites don’t have project files, which is where the configurations are stored.
None of these solutions is as good as the one that Visual Studio 2010 now offers: Web.config Transformation. When combined with the new Web Package functionality, this provides an easy, automated way of generating Web.configs with environment-specific settings, without duplicating the shared settings. This makes maintenance easier and reduces the risk of human error.
There are already good resources out there for using Web.config Transformation so we won’t go into depth demonstrating them here.
No MSBuild, No Transformation
The normal way to transform your Web.configs is to create a package, but it can also be done by running MSBuild at the command line with a target of TransformWebConfig:
msbuild MyProject.csproj /t:TransformWebConfig /p:Configuration=Debug
However, neither of these options are available from a Web Site. The Add Config Transforms and Create Package menu commands are missing, and without a .csproj file, the MSBuild method won’t work.
Hacking a Project File So MSBuild Will Do Our Bidding
These limitations may discourage you from using Web Site projects altogether. But with a little persistence we can work around the issues.
We need MSBuild to transform our Web.configs, and we need a project file for MSBuild to work. To solve this, I created an empty ASP.NET Web Application and made a copy of the project file that was generated. Then I opened it in a text editor and distilled it down to the minimum content necessary for our purposes:
<?xml version="1.0" encoding="utf-8"?>
<Project ToolsVersion="4.0" DefaultTargets="Build" xmlns="http://schemas.microsoft.com/developer/msbuild/2003">
    <PropertyGroup>
        <Platform Condition=" '$(Platform)' == '' ">AnyCPU</Platform>
        <SchemaVersion>2.0</SchemaVersion>
        <OutputType>Library</OutputType>
        <TargetFrameworkVersion>v4.0</TargetFrameworkVersion>
    </PropertyGroup>
    <PropertyGroup Condition=" '$(Configuration)|$(Platform)' == 'Debug|AnyCPU' ">
        <OutputPath>bin\</OutputPath>
    </PropertyGroup>
    <PropertyGroup Condition=" '$(Configuration)|$(Platform)' == 'Release|AnyCPU' ">
        <OutputPath>bin\</OutputPath>
    </PropertyGroup>
    <ItemGroup>
        <Content Include="WebSite1\Web.config" />
        <Content Include="WebSite1\Web.Debug.config">
            <DependentUpon>"WebSite1\Web.config"</DependentUpon>
        </Content>
        <Content Include="WebSite1\Web.Release.config">
            <DependentUpon>"WebSite1\Web.config"</DependentUpon>
        </Content>
    </ItemGroup>
    <ItemGroup>
        <Compile Include="Dummy.cs" />
    </ItemGroup>
    MSBuildBinPath)\Microsoft.CSharp.targets" />
    <ImportProject="$(MSBuildExtensionsPath32)\Microsoft\VisualStudio\v10.0\WebApplications\Microsoft.WebApplication.targets" />
</Project>
Lines 9-14 contain PropertyGroups with the project configurations you want to define. There is a one-to-one correspondence between the project configurations and the Web.config transforms. For example, if you specify Debug and Release configurations, you should specify Debug and Release transforms as well.
Lines 15-23 contain an ItemGroup with your Web.config and its transforms.
You’ll notice that the files are all in the WebSite1 directory, which is the main directory of the Web Site. The project file gets saved one directory level up, for reasons I’ll explain later.
The problem with MSBuild is that it wants to, well, build something. We don’t care about normal project output like an executable file or library; that goes against the concept of using a Web Site project in the first place. All we need are the transformed Web.config files. But if we don’t feed MSBuild at least one source file, it will throw an error:
CSC : fatal error CS2008: No inputs specified
Fortunately there’s no rule saying that the source file can’t be empty. Line 25 gives the name of a dummy file that we provide to MSBuild so it doesn’t complain. The file is zero-length.
Once you’re done setting up your project file, save it with an extension other than .csproj. This isn’t a “normal” project file, and you don’t want Visual Studio messing with it. I chose the file name WebSite1_Web_configs.build.
Finally, you’ll want a way to run MSBuild easily without having to fire up the Visual Studio Command Prompt every time. For now we can create a batch file named build.bat with the following commands (msbuild may be located elsewhere on your machine):
C:\WINDOWS\Microsoft.NET\Framework\v4.0.30128\msbuild WebSite1_Web_configs.build /t:TransformWebConfig /p:Configuration=Debug
C:\WINDOWS\Microsoft.NET\Framework\v4.0.30128\msbuild WebSite1_Web_configs.build /t:TransformWebConfig /p:Configuration=Release
pause
Putting Things in the Right Place
The aim of this process is to add the benefit of Web.config Transformation while maintaining the simplicity of a Web Site project, so you don’t want to clutter your site with project files, dummy source code files and batch files. For this reason, the files used in the transformation process (except for the transforms themselves) will be stored one directory level above your Web Site’s main directory. That way you can still do an XCOPY deployment with minimal effort.
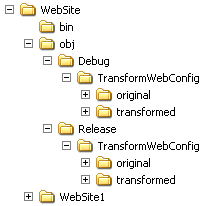
Here’s an example of the folder structure:
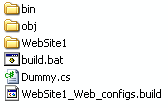
WebSite is the highest-level directory, and it has the following contents:
WebSite1 is the name of the main Web Site project directory; yours will probably be different. Dummy.cs is the zero-length dummy file MSBuild needs to run without failure. build.bat and WebSite1_Web_configs.build are the batch file and modified project file we created in earlier steps, respectively. The bin and obj folders are generated when you run the batch file that performs the build. bin can simply be discarded or ignored. obj will contain the original and transformed Web.configs.
Building is easy: simply double-click the batch file to run it and you should get a “Build succeeded.” message. Then, when you’re ready to deploy your site, simply copy the transformed Web.config from the appropriate folder under obj.
If you have a compelling reason to use Web Sites instead of the Web Application template and you don’t like manually tweaking Web.configs all day, then hopefully this technique will be of some value to you.

